If you can see Mt. Baker, you are part of The Experience
 |
Getting prepared for backcountry skiing
By Sam Lozier
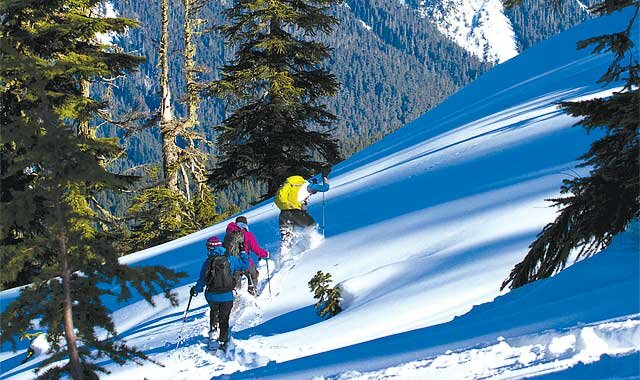
Photo by Patrick Kennedy
You’ve seen tracks out on Shuksan Arm or read about backcountry skiing in magazines. The allure of untracked powder is strong, but backcountry skiing can be initially overwhelming. Where do you even start? At a minimum, you’ll need to equip yourself with touring bindings, skis or a splitboard, skins, avalanche safety gear and a backpack to carry it all.
THE GEAR.
Bindings: Bindings from Dynafit, Marker and Fritschi will help you into the backcountry, but they each have their trade-offs. As a general rule, the further you want to hike, the lighter and more efficient your bindings should be. All alpine touring bindings work on the same principle: your toe is attached to the ski while the heel swings up, allowing you, with the use of skins, to hike up the mountain. When you reach the top and remove the skins, the heels are locked down for alpine-style downhill turns. Any touring binding can go on any downhill ski, including the ones you already own, though fatter and lighter skis are the best choice for winter touring as they offer a good mix of soft-snow flotation and weight.
Skins: Skins, along with bindings, make backcountry skiing possible. They’re sticky on one side and furry on the other. Directional hairs allow the skis to slide easily forward, but grip when the ski is weighted, providing fast and efficient progress uphill.
Backpack: For day trips, a 30- to 40-liter backpack should be enough to accommodate all your gear and will be large enough to hold the supplies you’ll need as you start going on full-day adventures. Though not always immediately necessary, ski-specific features such as ski-carry attachments, durable fabric (to protect against edges and ice axes) and non-absorbent back panels are nice to have.
SAFETY GEAR.
Shovel: One of the four avalanche safety essentials (beacon, shovel, probe and brain), a shovel is a surprisingly important mountain safety tool. It can dig you an emergency shelter, provide a surface to sit on, excavate a friend, dig out a car, open a beer (an advanced technique) and much more. Beginners frequently purchase shovels far larger than needed, so put some thought into this first. The features that make a shovel great for excavating your driveway are not the features to look for in an avalanche rescue shovel. You want one that is small, durable, lightweight and simple.
Avalanche debris sets up like concrete, so a smaller blade that allows more of a chopping/paddling motion is going to be more functional than one that requires prying and scooping. Since your shovel will be riding in your backpack most of the time, focus on lightweight metal offerings. Plastic shovels are not acceptable for backcountry skiing due to their tendency to shatter at inopportune times.
Probe: Probes are pretty simple, but still important. After locating a buried avalanche victim with your avalanche beacon, you’ll have to probe down to locate them precisely before digging. Get a lightweight probe that you can operate with gloves on that’s at least 260cm and ideally 300cm long. Trying to save weight by buying a shorter probe is a false economy; there are much better places to shave ounces off your load.
Beacons: Beacons are getting better all the time, and they are all quite functional, though they all do have their strengths and weaknesses. If you’re buying one for the first time, get a three-antenna digital beacon from a reputable manufacturer and make sure you know how to use it. It’s worth spending some time trying out different models at a knowledgeable shop.
EVERYTHING ELSE.
Clothing: Proper layering for mid-winter touring in western Washington is one of the more challenging things to master, and my own clothing system is always changing. The main thing to focus on is staying dry, so choose clothing that will wick and vent moisture. Realize that when hiking uphill in humid weather (normal mid-winter conditions), you will be generating a huge amount of body heat. Don’t be afraid to hike in just a base layer if that’s what’s most comfortable. Know that in certain conditions, all the outdoor clothing in the world won’t keep you dry – the only solution is more dry clothing in your backpack.
Water: In cold weather, it’s harder to notice when you’re getting dehydrated, but it’s just as important to stay hydrated in the winter as the summer as dehydration will lead to poor circulation (cold toes and fingers) and muscle cramps. Water bottles have the advantage of not freezing, but Camelbak-style bladders are easier and more convenient to use. If you’re not careful, the hose will freeze, though you can avoid this by blowing air back through the hose. On long day trips and overnighters, it’s often easier and lighter to bring along a camp stove, such as the MSR Reactor, to melt snow as you go, rather than carrying water for your trip the entire way.
Food: The longer your trip, the more important your choice of food becomes. You’ll want healthy, calorie-dense, easy-to-digest foods to keep you going. Energy bars fit the bill, but sandwiches supplemented with candy bars work equally well.
GETTING PREPARED.
Backcountry skiing is amazingly rewarding but does carry some risk. Like most hazards encountered in life, it’s possible to mitigate the dangers of backcountry skiing through preparedness and careful planning. More than the gear you carry in your backpack, your safety and comfort in the backcountry will depend on the knowledge and careful planning you carry in your head.
Hiking uphill all day through deep snow in cold weather can be rather tiring. Tired minds are more prone to bad decisions, so it’s important to match your fitness to your skiing goals both for safety and enjoyment reasons. If you’re just starting out, choose smaller, simpler objectives near the resort until you get all your gear and group dynamics figured out.
If you want to train for your backcountry skiing, the best place to start is to work on your cardio endurance; mountain biking and trail running are two popular off-season activities. Regardless of how strong a skier you are, if you can’t hike to the top of your run, you won’t be able to ski it. At a minimum, you should be able to ski any conditions you find at a ski resort. You’ll encounter a variety of snow conditions in the backcountry that rarely occur in a resort, and a strong skiing ability will go a long way to helping you through them.
A big part of the appeal of backcountry skiing is the complexity involved. Early on it’s easy, and correct, to minimize the complexity of your trips, but as you advance as a skier, taking on more complex goals adds to the fun and the challenge.
The first and most important thing to have in your mental filing cabinet is a working knowledge of snow safety and the forces and processes responsible for creating avalanches. Taking an Avalanche Level 1 class is a great place to start, but it won’t give you everything – it’s important to find competent partners who can let you in on their decision-making process. It is critical to remember that even though your friend is a great skier, it doesn’t mean they are a great avalanche forecaster. Choose your partners carefully, and be sure to question their reasoning. It’ll serve as a check against poor decision-making and help you understand how they assess risks. Remember, don’t just rely on someone else to make a decision for you – you have to think for yourself.
For more information on avalanche courses, check out the American Institute for Avalanche Research and Education, the American Alpine Institute or the Mt. Baker Ski Area.
The second, and most frequently underemphasized knowledge to have, is first aid. If the unfortunate happens and your partner breaks his leg or stops breathing after being buried in an avalanche, it’s important to know what to do.
LOGISTICS.
The logistics involved with a backcountry ski trip seem to get exponentially more difficult the longer the trip is, so when starting out it’s important to keep things simple. The fewer details there are, the harder it is to forget something or make a serious mistake.
When planning your trip, gather information from as many resources as possible. Check your route on a map, get a good understanding of where the hazardous terrain is, how steep it is, and how you plan to approach it and exit from it. Check guidebooks and search online for current conditions reports, and make sure everyone in your group understands the plan and is comfortable with it.
Finally, make sure to check the current Northwest Weather and Avalanche Center’s (NWAC) avalanche and weather forecasts. They’ll give you the best idea of what’s going on in the snow, what the weather is going to be, and which way the avalanche danger is trending. X
Sam Lozier is an avid skier, hiker, climber, photographer, and writer.


