If you can see Mt. Baker, you are part of The Experience
Discovered and developed by a small cadre of Bellingham boulderers, the development of the Lost Ledge bouldering area in Larrabee State Park was a passion project. Countless hours have gone into the area, first with the development and cleaning of the routes. Second, with the partnership of the state park allowing for said development. And finally, with the construction of trails to the area.
Every single hour put into this place was worth it!
The Lost Ledge zone holds some of the best bouldering in the Bellingham area. There are literally hundreds of problems and variations on Chuckanut Sandstone. In addition to this, the area is accessed from the most aesthetic lowland trail in the county. And the actual problems are nestled in the trees, like the eggs of a rare bird. It is a wonderful area.
This miniguide only covers a small portion of the boulders that have been discovered and cleaned. A full guidebook to Chuckanut Sandstone, for both roped and unroped climbs, is currently in development.
Area Considerations:
• Be wary of the sandstone when wet.
• A Discover Pass or a day pass is required for parking.
Approach Directions:
The trailhead for the Chuckanut Boulders starts at the top of Cleator Road in Larrabee State Park.
To get to the Cleator Road, take exit 250 off I-5 and drive west on Old Fairhaven Parkway. Turn left on Chuckanut Drive (12th Street), go 3.9 miles to Cleator Road (also marked as Hiline Road — the boat launch road sign is directly across from the turn). If approaching from the south on Chuckanut Drive, Cleator may be found 1.3 miles north of the standard entrance to Larrabee State Park. Take Cleator Road 3.5 miles up from Chuckanut Drive to the Cyrus Gates Overlook picnic area at the top. Note that there is an outhouse here.
From the parking/picnic area at the top of the road, take the Rock Trail on the southwest end lot. The trail contours around the mountain. Drop down several wooden stairs, eventually on passing a long cliff band. As you move away from the cliff band, you’ll see deep huecos (gaps) in the face. This is Hueco Wall. Continue on the trail across a footbridge and then continue a bit farther to the next set of steps, .75 miles from the parking lot. Do not go down the steps.
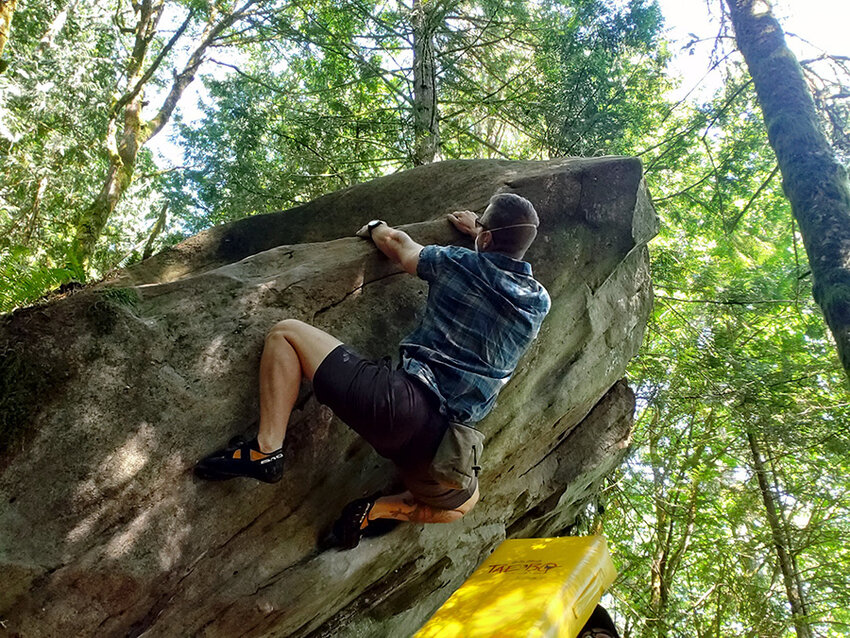 TJ Holert on Plandemic-TJ-1. Chris Connell photo
Instead, go straight on the climbers’ trail, the Lost Ledge Trail. After walking for about 60 seconds, you will encounter “The First Trail,” up to some boulders not covered here. After about 2.5 minutes, you will arrive at the Pandemic Boulders. Continue on for another minute or two and you will come to a switchback that drops off to the right. There is also the possibility of going straight. There are a handful of problems — short bouldering climbs with a series of hard moves — at a clearing just beyond the switchback in the Upper Area (not covered here). The remainder of the problems require that you drop down some steps and then cut back to the north. The trail will take you right into the heart of the boulders.
The main area is .9 miles from the parking lot, west of the north end of Lost Lake. It's easy to hear people down at the lake from the area. It takes between 20 and 30 minutes to make the approach. Expect to lose a fair bit of elevation on the way down to Lost Ledge.
Plandemic (V2) This is the obvious line right next to the trail. The line starts on a horizontal edge and then works up to the right, with a top-out on the left. First Ascent (FA): Art Bass, 2020
Lip Traverse (V1) To get to the Lip Traverse and the Social Distancing Slab, follow the trail left of Plandemic. The Lip Traverse faces the Social Distancing Slab. The line is low, and a bit dirty, with a beached whale finish … but is kinda cool despite all that. FA: Unknown
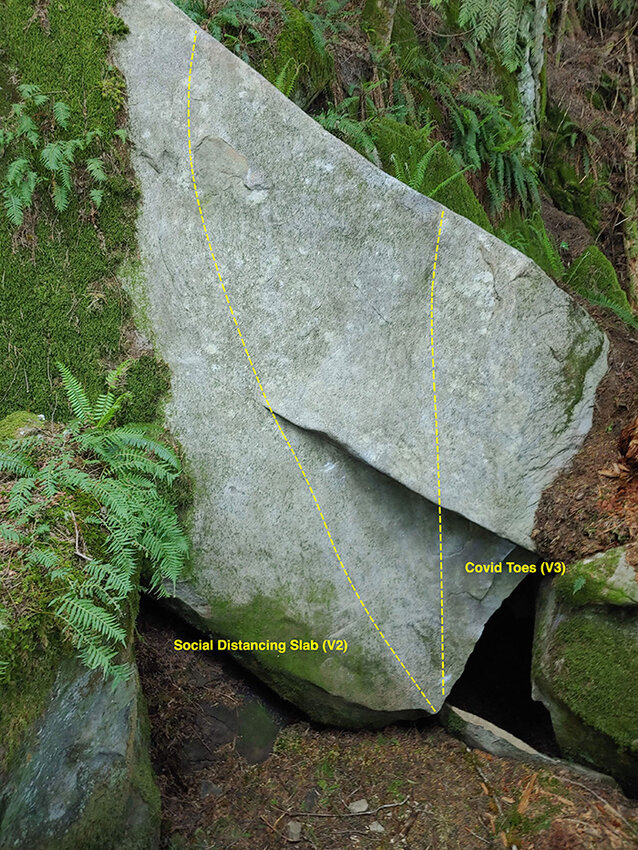 Social Distancing Slab (V2) This line climbs up the left-hand side of the slab and starts with a side-pull. A line that is fun and slightly out of character from the others in the area. FA: Art Bass, 2020
COVID Toes (V2) Start from the same side-pull as the last climb, but trend straight up/stay right. FA: Art Bass, 2020
There is a small cave immediately to the right of COVID Toes. This is the Batcave and doesn’t go anywhere. To the right, there is another cave — the Corona Cave — that will take you down to the remaining Pandemic Boulders from the Social Distancing Slab.
Murder Hornet (V2/V3) This cool face climb is oriented toward the Lost Ledge Trail. It’s possible to approach from the previous climbs through the Corona Cave, but it makes more sense to continue for a few seconds past Plandemic on the Lost Ledge Trail. There’s a single big move at the top! FA: Art Bass, 2020
N95 (V4) Start immediately to the left of Fauci’s Folly. Stay on the arete to keep it V4. FA: Trip Brannen, 2020
Fauci’s Folly (V1) There are four problems near the Corona Cave, three of which are on the same feature, left of the Corona Cave. This is the middle climb, just above the retaining wall. This line shares the same start as the following problem. Make your way out to the left on the face. FA: Art Bass, 2020
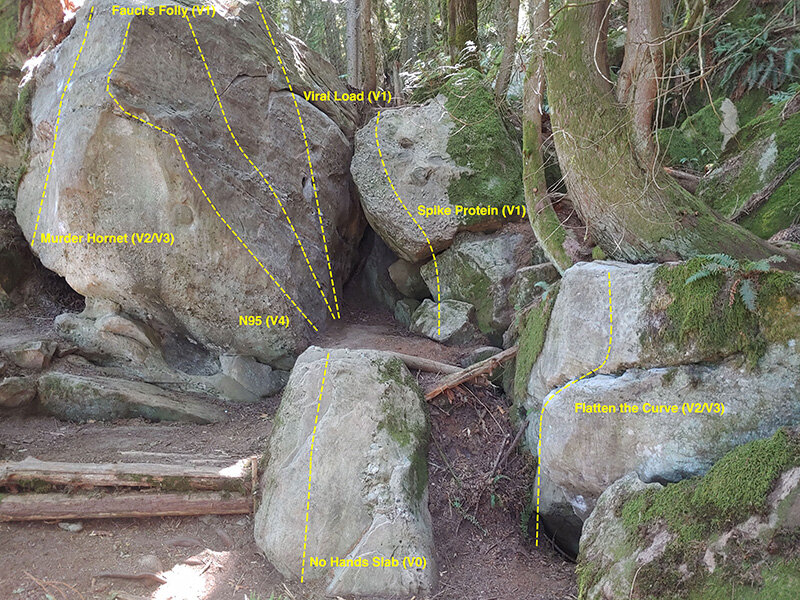 Viral Load (V1) Start as for the preceding line and make your way up past a horizontal crack. FA: Art Bass, 2020
Spike Protein (V1) This is the block above the Corona Cave. The problem may also be used as a downclimbing option for those who don’t wish to climb through the cave. FA: Art Bass, 2020
No Hands Slab (V0) This is a fun little thing. Try it on both sides. FA: Unknown
Flatten the Curve (V2 or V3) The final boulder in the Pandemic Boulders can be found just left of the No Hands Slab. The V2 variation starts in the pockets on the left. The V3 variation begins with a sit-start, left hand in an undercling and right hand in a 3-finger pocket. FA: Art Bass, 2020
The main area can be found down the trail a few minutes from the upper area. The heart of the area is at the easily identifiable Snaked Boulder. This is the boulder that will be used to identify other boulders in the area. The main trail drops you right at the Snaked South line.
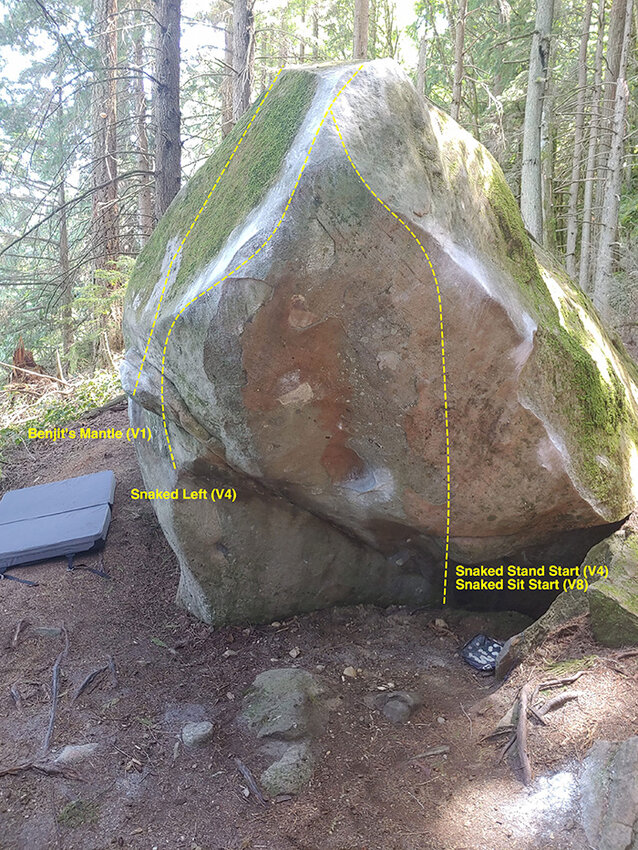 Snaked (Left Variation) (V4) Start on the big jug on the left side of the feature. Work up right onto the state. FA; John Lyman, May 13
Snaked (Stand Start) (V4) Truc Allen was the first to play on this gem. He called it Snaked because he never got the sit start. Johnny G took the prize line. FA: Truc Allen
Snaked (Sit Start) (V8) FA: Johnny G for sit start.
Baby Snake (easier than V) This no-hands, low-angle descent slab is found right of the previous line. Call it one for the kids. FA: Unknown
Snaked South (V0) This south-facing slab is the first you'll see when approaching the main area. There are a couple of different variations here, all in the V0-V1 range depending on how you link them. FA: Unknown
Snaked East (V0) Another lowish-angled slab. There are a number of variations here as well, often combining slab moves with scrubbed nubbins. FA: Unknown
Benjit's Warm Up (V1) To the right of the Snaked East variations, and to the left of the Snaked jug, a crimp-line that allows for a sit-start may be found. FA: Benjit Hull
Benjit’s Mantle (V1) Start on the same jug as the left variation of Snaked. Mantle on the jug, going straight up. FA: Benjit Hull
Pablo's Warm Up (V0) Directly across from Snaked. Climb the left arete to the top.
Pablo's Warm Up Slab (V0) The slab with many variations on it found on the west-face of the Pablo's Warm Up boulder. There are a number of very easy scrambles here on nubbins. FA: Unknown
To access the Name of the Wind boulder and other problems around it, walk uphill from the Snaked boulder toward The Conjuring. Take a trail to the left and pass beneath the Name of the Wind. Alternately, it's possible to walk directly up to it by following a faint trail next to an overhanging boulder (Worst Problem Ever – V3), 50 feet before reaching the Snaked boulder.
Benjit Slab (V2) This dirty little warm-up is on the trail just downhill and left of Name of the Wind. Start on the “old-man-nose-knob” and go up. FA: Unknown. FA: Benjit Hull
Underthing (V7) This line starts in the triangular cave behind the small boulder. Sit start with left hand pinch in triangular cave, and right on an undercling. Blast up to the second hold for Name of the Wind and then finish on that route. FA; Gabriel Cisneros
 Issac Howard on The Conjuring. Gabriel Cisneros photo
Name of the Wind (V7) Sit start on blocky boulder, just right of the middle. Use the lowest possible crimp and then work your way up. The feet are tough. FA: Gabriel Cisneros
Road to Tinue (V4) This line starts to the right of the blocky boulder, right of Name of the Wind. Sit start on jugs, up into the finish of the previous line. FA: Gabriel Cisneros
The Conjuring (V9) Less than 100 feet west of the Snaked Boulder, this line climbs a beautiful left-leaning arete. The area's initial write-up called this the "king of lines," for obvious reasons. It was discovered and cleaned by Isaac Howard. FA: Art Lim?
The Slab (V1) This is found on the north face of the Conjuring Boulder, about 100 feet uphill from Pablo's Warm-Up. FA: Unknown
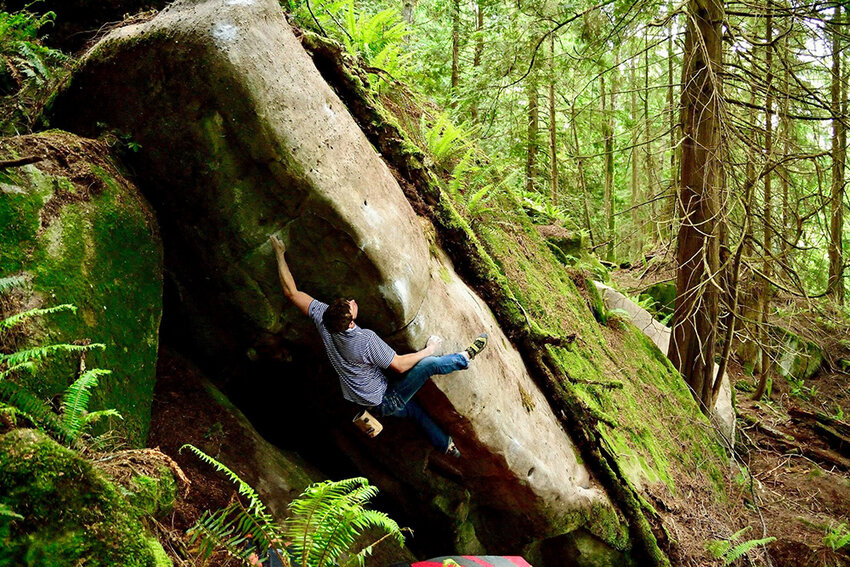
MCL (V5) This may be found on the south facing Collateral Damage Boulder, directly across from The Slab, and about 100 feet uphill of Pablo's Warm-Up. Start low on the rail and work up to the left side of the boulder. FA: Art Lim
ACL (V6) Start on the same rail as the previous route. Work up to a big dyno. The dyno's not so big if done from small crimps, but ... small crimps. FA: Art Lim
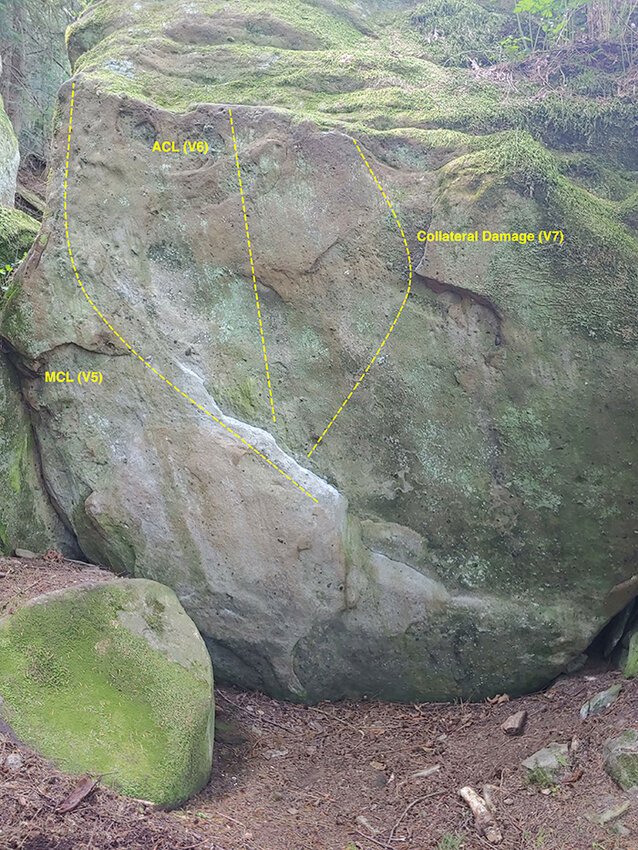 Collateral Damage (V7) Start on rail, and lung up and right to a bad gaston. Isaac Howard blew out his knee attempting this line. He returned a week after the injury to complete the send. FA: Isaac Howard
The Bet (V7) Immediately right of the Collateral Damage Boulder, there's a slabby problem above a dirty sloping landing. Start on the left, right hand in small shallow two-fingered pocket and a high foot. FA: Art Lim
The Right Boulder (V0) This boulder with a cool "eye" feature is about 50-feet right of the previous problem up a small trail. FA: Unknown
This area is found less than 60 seconds north of Snaked on the main trail. The Aeolian Area is in the “Second Boulder Basin." The first boulder up and to the left, with the obvious rib going up the middle is the Laid Back Boulder.
Unknown Left-Facing Crack (V2) This crack line is found 4 feet to the left of the central Barefooted Lady rib. Sit start. A combination of poor jams, liebacks and smearing will win the day. FA: Unknown
Barefooted Lady (V4) A beautiful line up the center of the boulder on the central rib. Start as low as possible on an undercling and work up. FA: Jeremey Zachariash
 Tripp Brannen on Aoelian. Gabriel Cisneros photo
Scoop Project (V12/13) A scoop can be seen about 10 feet to the right of the Barefooted Lady. Start in the scoop, move left onto crimps and work up. FA: Not yet climbed
Truc’s Lip Traverse (V1-V4: Variation and length dependent) This is found on the main trail about 100 feet past the Laid Back Boulder turnoff, just before you drop into the third "boulder basin" and the Load Management Area. Climb up from either side. The farther you go, the weirder and harder it is. The complete traverse is V4. FA: Truc Allen
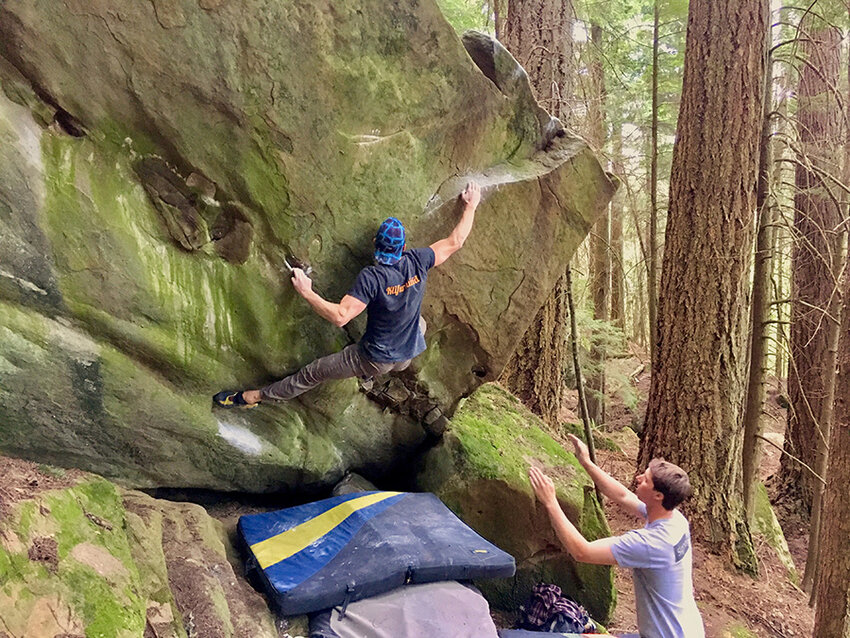
Aeolian (V6) The Aeolian Boulder is directly uphill from the previous boulder, just right of a massive tree. Sit start on the chalky jug near the shallow cave, with the right foot way out on the edge of the boulder. Work up the face to a sloping rail and then top-out. FA: Gabriel Cisneros
 Ventifact (V8) This is a left-variation to the previous line. Start as for Aeolian, but work left on the crimp rail. Use the crimp left of the Aeolian rail and throw fir the top. FA: Art Lim
Jungle Warefare (V5) A large mossy boulder leans up against the Aeolian Boulder. This problem is found to the right of that, 15 feet right of Aeolian. Start on an undercling on the right side of a shallow triangle. Make a massive reach for the blowhole, then work up to the top, either on the inside or the outside of the arete. Exceptional footwork required. FA: Isaac Howard
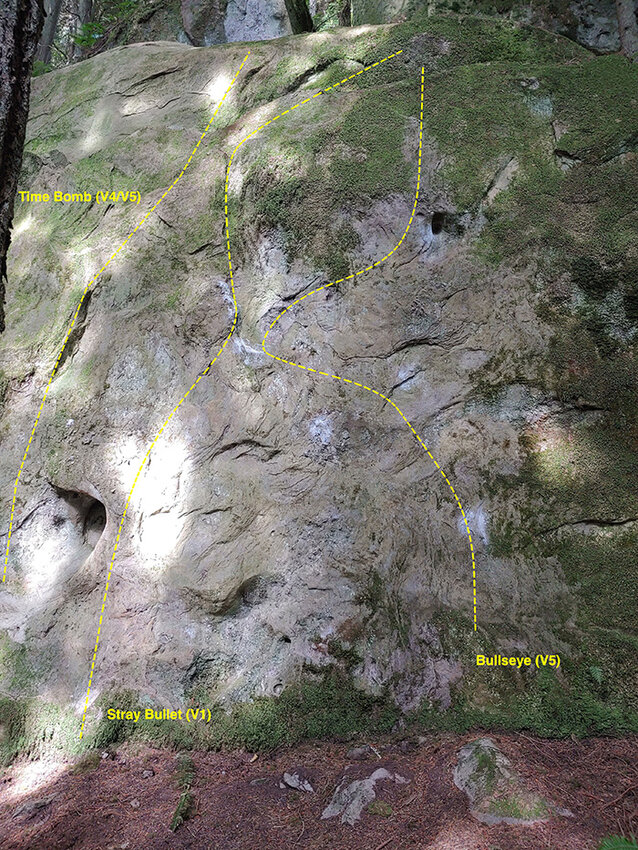
Time Bomb (V4/5) To get to the Time Bomb area, walk up the trail right of Jungle Warfare. The trail arcs back around to the left, under a face with a large hueco in the center of the wall. This line is to the left of the largest hueco. Start on a right-angled edge with the right hand and an uncut sidepull with the left. Work up the left side of the face on delicate holds to a sketchy mantle over the central bulge. Not a great place to fall. FA: Sam Sheesley
Stray Bullet (V1) From the central hueco, make a big move up and right to a jug. Work up left to more — sometimes mossy — jugs to the top of the boulder. FA: Trip Brannon
 TJ Holert on Barefooted Lady-TJ-1-3. Chris Connell photo
Bullseye (V5) To the right of the previous route. Start with the right hand on a sidepull about 4 feet off the ground, and the left in cobble. Work up and left into Stray Bullet, but then leave that line, reaching out right to the little hueco about 10 feet up. Finish on good crimps. FA: Trip Brannon
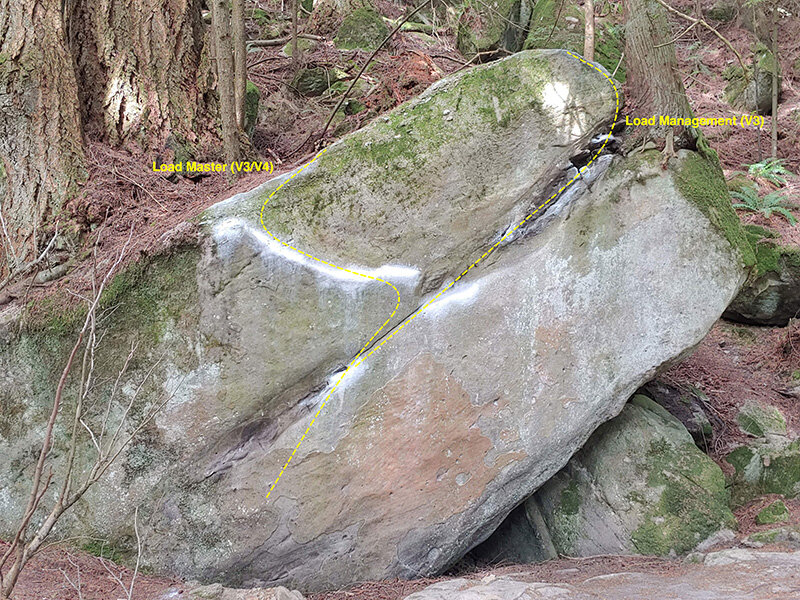
This is the "Third Boulder Basin" on the main trail. It is just beyond Truc’s Lip Traverse. The most obvious boulder in this basin is the Load Management Boulder, which is easily identified by the tree growing off the top of the right-hand side.
Backward Jockstrap (V4) This is the crack problem left of Load Management Boulder. Start on the jug that points to the right in the cave. Work up into the crack and top-out. Beware the landing. FA: Isaac Howard
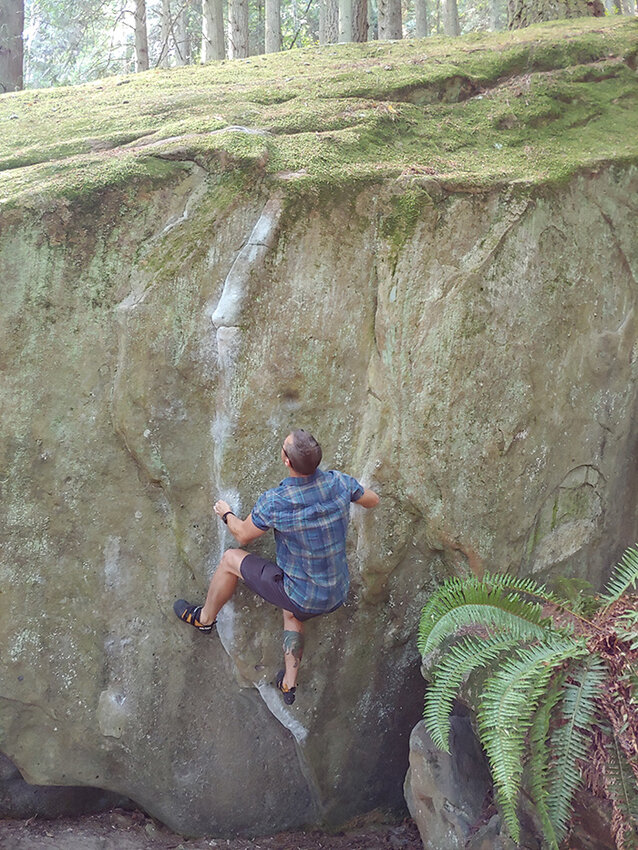
Load Master (V4) The boulder to the right of Backward Jockstrap. Start on the jug in the center of the boulder. Hit the slopes, working up left and top-out. FA: Isaac Howard
Air Bud (V3) Start at the jug and dyno to the lip. FA: Ian Dandridge
Load Management (V3) Start at the jug and work up right, topping out next to the tree. FA: Isaac Howard
 Many Faces (V0) This boulder with a number of fun and easy variations on it may be found approximately 100 feet northwest of Load Management Boulder on the Lost Ledge Trail. The actual Many Faces problem climbs up left of the moss, up over a mild overhang. However, there are many other options and variations. FA: Mateo Cisneros
Second Face (V0) This problem is to the right of the moss beard on the rock and uses a combination of the horizontal crack and the arete on the right hand side. FA: Sky Cisneros x
Jason Martin is the executive director at the American Alpine Institute, a mountain guide and a widely published outdoor writer. He lives in Bellingham with his wife and two kids.


