If you can see Mt. Baker, you are part of The Experience
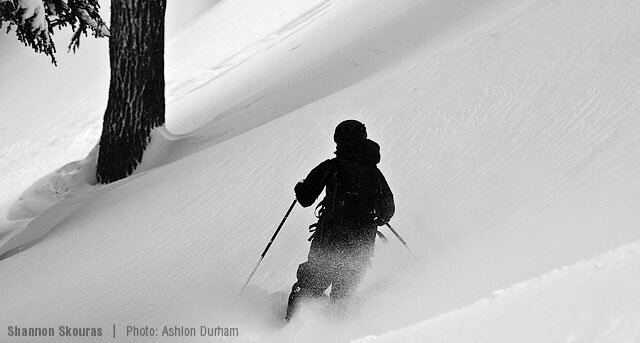 |
Face shotsCarving fresh tracks in the backcountryBy Shannon Skouras, photo by Ashley DurhamWinding up Highway 542, the sun plays hide and seek through the clouds and mountain peaks surrounding us. With our dog in the back of the Subaru, skis and splitboard on top, and coffee in hand, we eagerly look forward to a day in the beautiful Mt. Baker backcountry. Arriving at Heather Meadows base area, we park at the uppermost lot at the foot of Mt. Herman. From this point, the backcountry is accessible even without a day pass to Mt. Baker Ski Area. Snowshoers, skiers and snowboarders are all welcome to start at the bottom of the Blueberry Cat Track as they begin their trek to the Blueberry Backcountry Gate on their quest toward Artist Point, Table Mountain or the Chimney. Climbing out of the car, we take the first few steps slowly to see if it is one of those days where the icy parking lot of death is more dangerous than the ski slopes awaiting us. Taking in the mountain air, stretching after the drive from Glacier, we take a moment to appreciate the beautiful area that we call home. Knowing that the backcountry isn’t going anywhere, we start to get ready for another day out of bounds. Making sure that the avalanche danger is low for the day, we strap on our transceivers, pack our backpacks with our probes, shovels and snacks, and grab our boards and skins. Five minutes later, with our skins attached to our skis and splitboard, we check our transceivers to ensure that we are both receiving and transmitting each other’s signals and set off up the right side of Blueberry Cat Track. Side by side, we slowly make our way to the Blueberry Backcountry Gate, taking in the majestic site of Mt. Herman to our right. Once we reach the gate, we follow the skin tracks ahead of us, up the switchbacks, eventually reaching the base of the Chimney. We take a snack and water break, knowing that we will need more before the climb that lies ahead. We take the skins off our skis and splitboard, stowing them in our bags, strap our skis and board to our backpacks and start the climb up Chimney. Icy footholds and handholds from adventurers before us mark the path to the top of this rocky formation. Halfway up, we look back over our shoulder to see Mt. Baker sprawling over the landscape behind us. I look at my partner, knowing that this moment will stay with us forever. We finally make it to the top of Chimney, relieved that the hike is over finally. Clicking into our skis, we decide to get first tracks for the day on an area named Mini-AK. One at a time, we drop in, floating through more than a foot of fresh powder, popping off spines and hooting and hollering the entire way down. Joy and freedom envelop us as we relish in the victory of our descent. With poles in hand, skins on our skis and board, and smiles on our faces, we set off on yet another backcountry adventure. Fresh powder calls our names, and we never hesitate to answer, one face shot at a time. X Shannon Skouras can be found shredding powder in the Mt. Baker backcountry or riding her downhill mountain bike near her Glacier home. the skinny on skinning Skinning is a quick and easy way to access the backcountry, and it is far less tiring than boot packing. Skins are long strips of nylon with synthetic fur or scales on one side and resusable adhesive on the other. Attach to your ski or board base and they allow your skis to glide over the snow, but keep you from sliding backward. You’ll To attach skins to your skis or splitboard, follow these easy steps: 1. Attach D-Ring to the front tip of the ski. 2. Stretch the skin out the length of the ski, sticky side down, and press onto the bottom of the ski. 3. Once the skin is stuck to the bottom of the entire ski and is in place, attach the bottom clip to the bottom tip of the ski. 4. After both of your skins are in place, click your bindings into hike mode, and your skis or splitboard are ready to start the trek uphill. safety first Before you begin exploring, it is important to have avalanche and backcountry knowledge so that your adventures are as safe as possible. Avalanche courses are a great way to learn about backcountry safety as well as to meet other people who are interested in exploring the beautiful mountains that are so close to home. A backpack, probe, shovel, buddy and a beacon are all necessary for safe backcountry travel. Everyone in your backcountry group should have these essentials and know how to use them quickly and efficiently. For info on backcountry courses, see aai.cc or mtbaker.us. |


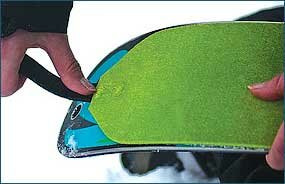 need alpine touring (AT) equipment with AT bindings and skins, which can be purchased from any outdoor specialty retailer and trimmed to size.